I have had a few people ask about the pallets I made for my infinity table so thought I would make a post, a sort of how to if you will. These pallets are relatively cheap to make ( especially in comparison to buying scenery outright instead of making it your self. ) These little things are great for any table, the only down side is they are slightly fragile. I have never had one break but would not recommend using them at a gaming club where they will get tossed about by all the cheesy wotzit kids.
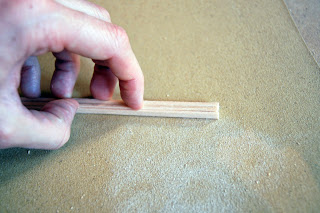
2. First up cut the long rods into sections of 7cm. Do one then use the first as a guideline to make sure you get them all as close to the same length as possible.
3. next up cut thin strips of the long thin balsa wood into strips just over 21cm long. They can then be cut into smaller strips of 7cm, making sure the pallets will be square when they are done.
4.When you have everything cut up you should have a nice little wood pile like so.
5. If you did use the first rod as a guide for cutting all your wooden panels should be about the same length, but you will inevitably have a few that are slightly longer or shorter but hopefully not by much.
6. Grab 4 panels at a time in a tight grip and gently file down in a circular motion to round them all off to the same size.
7. Some of the long strips might also be fatter or thinner than their counterparts so again grab 4 at a time and gently sand them down to the same width.
8. When this is done you should have two nice big piles all ready to stick together into pallets.
9. Get three panels and line them up and give each three generous blobs of wood glue in the same spots ready for the first thin panels to go down and start to form the basic shape.
10. I always keep the first attempt on had for a reference when doing anything like this to make sure it stays as similar as I can get it. Its really tempting to start putting down all the strips but when the first three have been done leave them a while to dry. I recommend a full episode of Star Trek, one episode is just about perfect wood glue drying time. Don't worry if the glue spills out a little, it will dry clear and also shrink and when the pallets have been loaded up with goods it wont be visible anyway.
11. You should have a nice workshop like this waiting for you when you come back after what every it is you do to keep yourself occupied for 45 minutes.
12. Next do the same as before on the top side with the four other strips. the panels should be firm in place now so this process is not very long.
13. Just do one side for now, to stop and strips getting knocked about if they are on the bottom.
14.When you have all that done, again go entertain yourself for 45 minutes then come back. Everything should really be taking shape now.
15. Next do exactly what you did before accept this time you can just wack down all the thin strips on the underside in one go as the pallet should be sturdy now.
16. Its better to over compensate and to have a few of the thin strips hang over than to have any to short. If the glue is completely dry they should be held nicely in place so its easily fixed with a quick sand down on glass/sand paper.
17. When this is done your basic pallet is done and looking good.
18. I would really like to have dozens and dozens of these and make a sort of paint ball arena that could be used as a training ground for my infinity games. But I really don't have the patience to make hundreds of these.
19. Next up was my favorite part of this project. Gather up anything you feel like putting on the pallets. As my board is an abandoned processing plant I got lots of old tyres, piping and square bits of wood that will eventually be painted up like rusty boxes. i managed to grab loads of Lego Technic tyres from Leeds gaming fair but they can be bought online quite cheap.
20. As these bits will mainly be used for Infinity I left most of the pallets with nice spaces for individual models to stand on and use as cover.
21. Next up its time to make the tarpaulin, I wanted this to only cover half the model. As I said my board is abandoned and I wanted it to look like the Tarpaulin was thrown on to cover the goods in a half arsed rushed manner as people were off in a hurry. Or to look like they have been blown off after being left and neglected. Get a tub and make a mix of 50/50 PVA and warm water and give it a good mix so the PVA does not gather at the bottom of the tub.
22. I used toilet paper, but be careful to get it the right side up, It would look a little out of place if your gaming board had the Andrex logo posted all over it.
23. Get two sheets of paper and double them up to make a perfect square. Give them a nice dip in the gloopy PVA mix then quickly place them over the top of the pallet. If you take to long the paper will fall apart as the glue is quite heavy, but you need a lot of PVA to make the tissue dry nice and solid over night and be robust enough to be played with. Try not to spend to much time posing the paper as it will look natural if its left to dry how its left. Don't worry about how messy it is or worry about getting glue on the wooden pallet it should all run off and wont damage it at all.
24. You will be able to see through the paper at the moment but don't worry it will dry completely opaque and look more way more natural.
25. When you drop the paper down try and do it lightly so it doesn't cling to the scenery to much, as Tarpaulin is quite a rigid material.
26. When you have covered all the bits you want with tissue find a dry spot and leave them for 24 hours. It takes ages to dry but when its done the results are well worth the wait.
Then there you have it, big ol bunch of plonkable scenery that's unique and cost about £20 and one day to make. It can be used for pretty much any system on the table top and also works really well for any Role Play games that are not fantasy based. It will get painted at some point but its pretty effective as it is to be used on the table.


No comments:
Post a Comment